Step 3
Create a Terms & Conditions check box.
- Create a CHECKBOX field on your form: PaymentPlanTerms
- Leave instructions blank.
- Label the field (this is the text for your T&C): I agree to the terms of this payment plan. I agree to make 1 payment today and agree to have the remaining 3 payments auto-charged every month until paid in full. I understand all payments are final and non-refundable.
- Required for Patron: Checked
- Initially Hidden: Checked
- Hide/Unhide Calculation: PaymentOptions==2
Other Examples
I agree to the terms of this payment plan. I agree to make the 1st payment today and agree to have the remaining balance auto-charged on May 1st, 2027. I understand all payments are final and non-refundable.
Step 4
Create the 1st of 3 constants.
- Create a constant: #PAYPLAN_NUM_INSTALLMENTS
- Value: 1
- Description: Enter the # of installments. Enter 1 for 1 remaining payment (Initial + 1 remaining). Enter 2 for 2 remaining payments (Initial + 1st remaining + 2nd remaining), etc.
Warning: This value is the number of remaining payments. Don't include the initial payment. If you are doing two (2) total payments, enter one (1). If you are doing twelve (12) total payments, enter eleven (11).
Step 5
Create 2nd & 3rd constants. You will only use 1 of these 2. We recommend creating both now. Use 1 and disable the 2nd.
Option A
- Create a constant: #PAYPLAN_START_DATE
- Value: ""
- Description: Enter the date format as a string "YYYY-MM-DD". Enter "" to disable. (don't forget the quotes)
Option B
- Create a constant: #PAYPLAN_START_DAYS_AFTER
- Value: 0
- Description: Enter the # of days (1-364) after submission the payment plan will start. Enter 0 to disable.
Important: You must NAME these three constants these exact names. (copy and paste form this article)
Example
In this help article, we're configuring a payment plan that is 4 total payment (1 initial + 3 remaining). The remaining payments will start in 30 days.
#PAYPLAN_NUM_INSTALLMENTS: 3
#PAYPLAN_START_DATE: "" (b/c we're not using this)
#PAYPLAN_START_DAYS_AFTER: 30
Step 6
Most communities already have a calculation that represents the Grand Total your members will pay via AGS. It is often called: {PaymentViaAGS}
- Uncheck Payment Item from {PaymentViaAGS} and any other Payment Item. (you will create a new Payment Item in the next step)
Step 7
Create 1st of 2 new calculations and place them directly under the Grand Total {PaymentViaAGS} you just unchecked.
constants.
- Result Name: {FirstPaymentViaAGS}
- Check: Payment Item
- Expression: Add a calculation to determine the 1st initial payment. Use an if statement to return the calculated value if the Payment Plan is selected, otherwise, return the Payment in Full.
- Examples
- If you are doing half now half later: if( PaymentOptions==2 , {PaymentViaAGS}*0.5 , {PaymentViaAGS} )
- If you are doing 4 equal payments. 25% now and 75% later: if( PaymentOptions==2 , {PaymentViaAGS}*0.25 , {PaymentViaAGS} )
- If you are doing small payment now ($5.00) and the rest later: if( PaymentOptions==2 , 5 , {PaymentViaAGS} )
Step 8
Create 2nd of 2 new calculations.
- Result Name: {DueLaterViaAGS}
- Check: Future Balance Due Item
- Expression: Add a calculation to determine remaining payment due: {PaymentViaAGS} - {FirstPaymentViaAGS}
Step 9
Preview your application using the preview tab.
- Complete the form
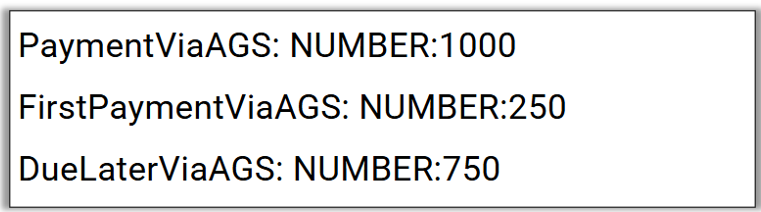
- Scroll to bottom calculations area and view the calculation find...
{FirstPaymentViaAGS}
{DueLaterViaAGS}
Frequently Asked Questions
How do I turn off or disable a payment plan option?
If you are a seasonal swim club, you may want to turn off your payment plan option after a specific date. We recommended auto-selecting Pay in Full Now and hiding your form's fields. This will force all members to Pay in Full Now. Next year, you can simply unhide again.
Here is how...
- In the field PaymentOptions, click Pay in Full Now.
- Hide the field PaymentOptions.
- Hide the field PaymentPlanHelpText.
Can members cancel the payment plan?
- No, only the community (a user with permission) can cancel the payment plan.
How to cancel a payment plan? How to issue a refund?
While viewing the application (eyeball icon), the community can take additional actions...
- View the Journal to read the log of all activity.
- Click the gear icon. Then click Cancel Payment Plan to cancel all future payments.
- Click the gear icon. Then click Request Payment Refund to issue a full or partial refund.
What if I choose a Start Date that is already in the past?
- If the payment plan's start date has already past, a payment is triggered immediately. Only one payment is triggered per day, but a payment is triggered each day until “caught up”.
- For instance if payment plan is configured to start Jan 1, 2027. Then a member applies on March 15, 2027. The first payment is triggered March 15, second is March 16, third is March 17, fourth is April 1, fifth is May 1, etc. It took 3 payments (days) to catch up. After the successful March 17th payment, the payment plan was back on schedule and triggered on the 1st of the month as configured.
- How this works is important if you are a seasonal swim club and forget to turn off your Payment Plan option as you get closer to pool season.